Here are a few options for how to remove Hebcal events from your Outlook 365 calendar on Windows:
To remove an Internet Calendar Subscription from side-by-side view, clear the check mark for the calendar in the Navigation Pane.
To remove the Internet Calendar Subscription from the Navigation Pane, right-click the calendar name, and then click Delete calendar name.
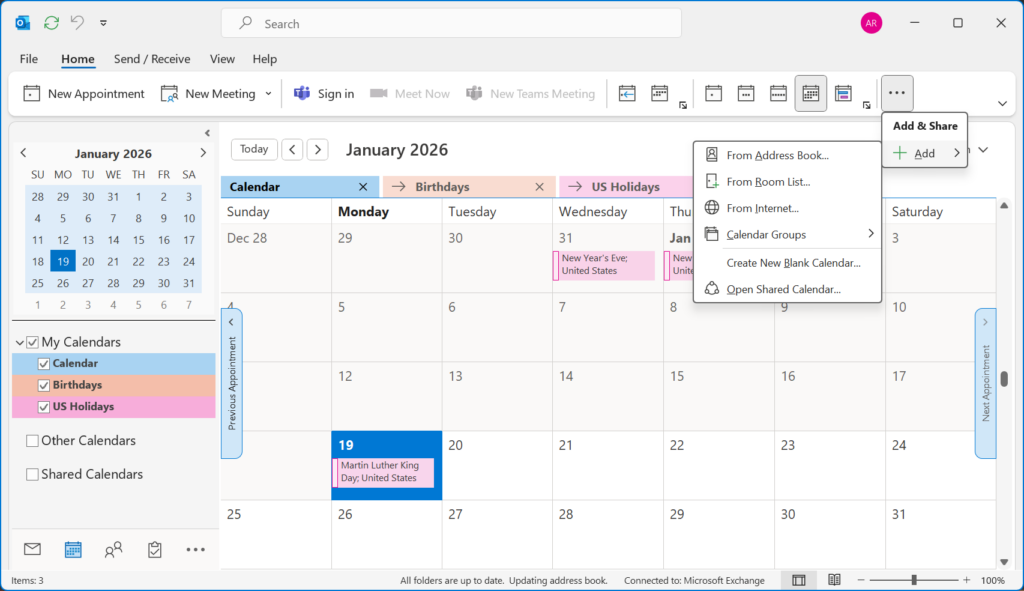
Internet Calendar Subscriptions can be added, changed, or removed from the Account Settings dialog box. On the Tools menu, click Account Settings, and then click the Internet Calendars tab.
These instructions also apply to Outlook 2007, Outlook 2010, or Outlook 2013 on Windows.
Follow these instructions to add a Hebcal Jewish holiday calendar 5-year feed to newer versions of Microsoft Outlook for Windows. This method has been tested on Outlook 2021 – also called “Outlook classic.” This method does not work on “new Outlook” for Windows.
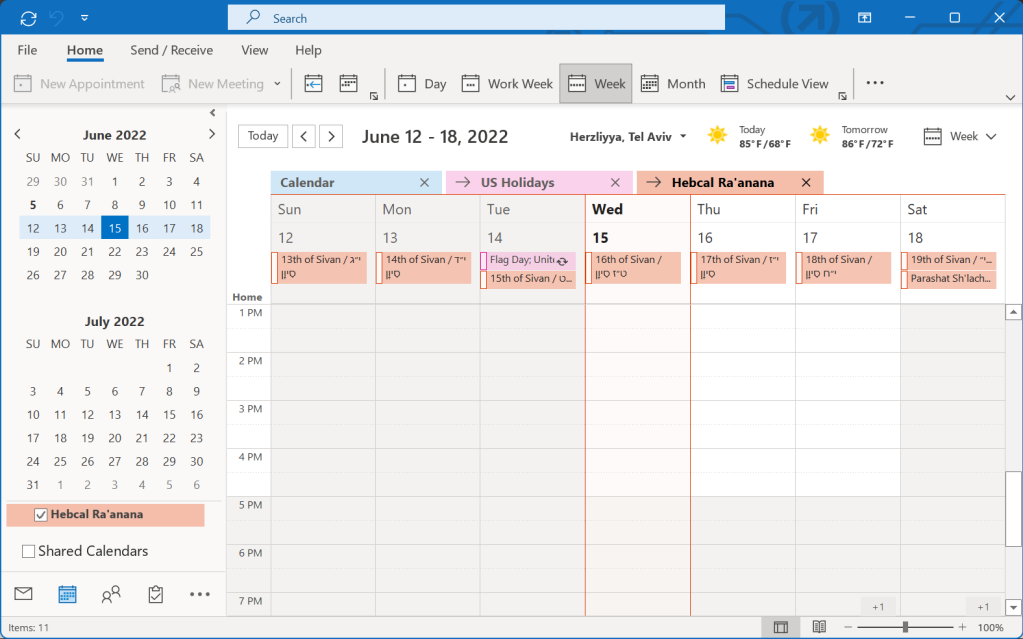
This technique uses Outlook’s “Internet Calendar Subscription” feature which keeps a separate calendar from your primary calendar. The calendar appears as an “overlay” and can be managed separately from your main calendar.
This method is preferred for modern versions of Outlook, e.g. Microsoft 365 / Office 365, Outlook 2021, Outlook 2019, Outlook 2016, Outlook 2013, etc. We still support the legacy CSV Jewish holiday download option used by Outlook 2007 and earlier versions.
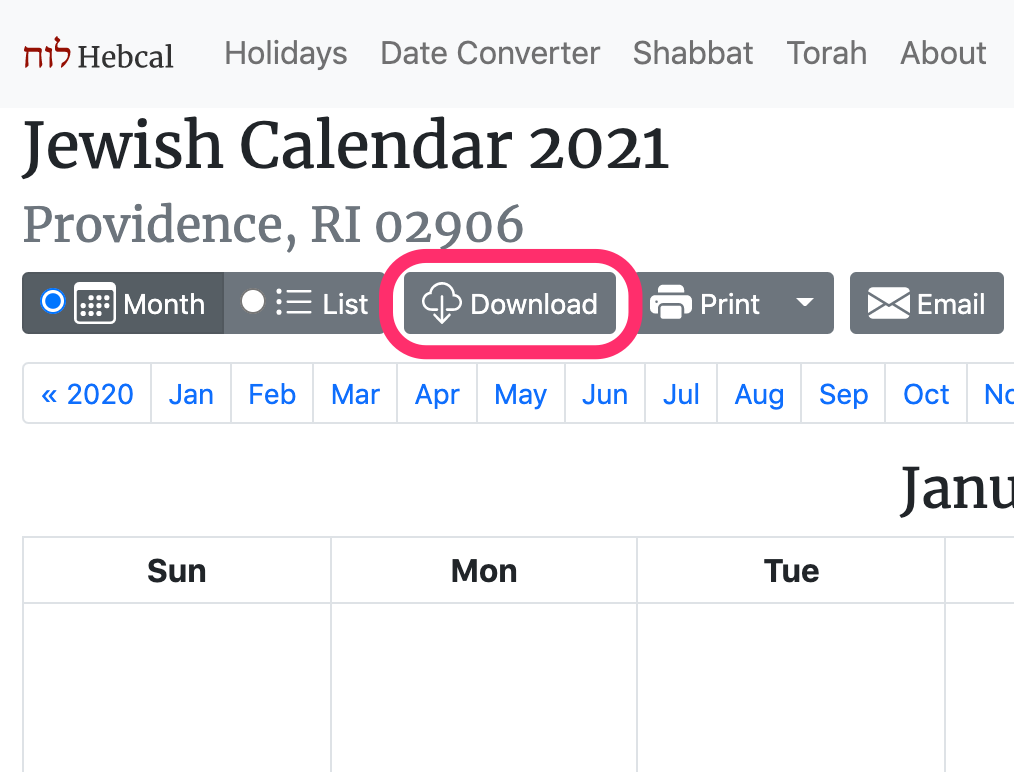
1. Open a web browser on your Microsoft Windows computer.
2. Fill out the form with your preferences and click the Create Calendar button
3. Click the Download… button
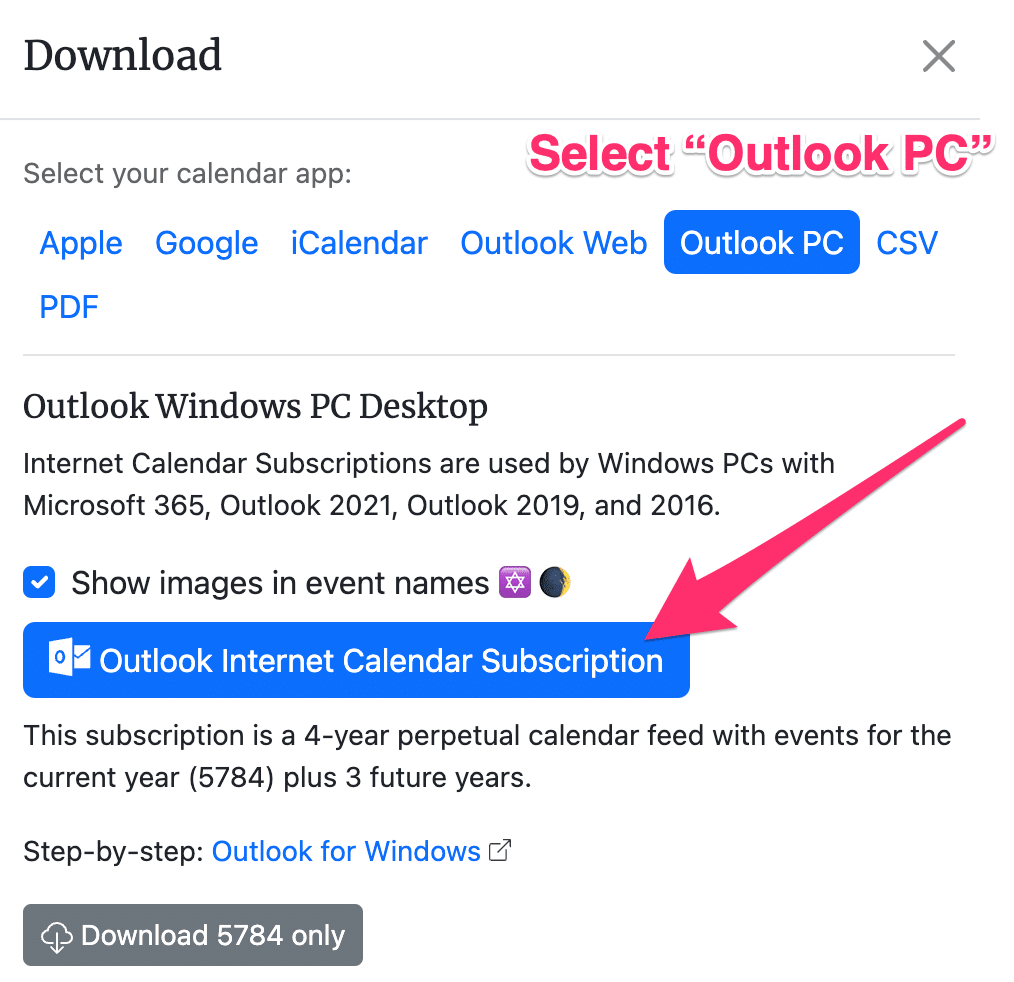
4. Select the Outlook option from the Download dialog box
5. Click on the Outlook Internet Calendar Subscription button
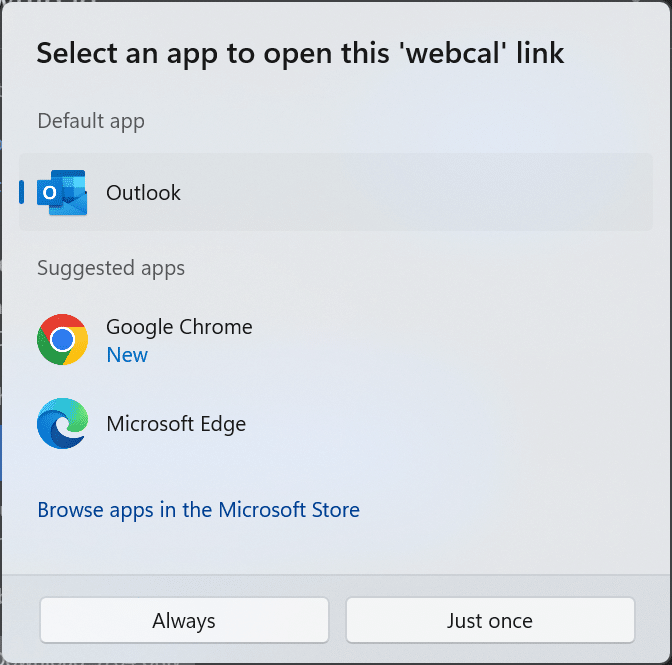
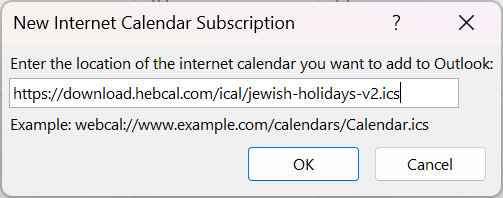
6. You might be prompted to acknowledge that you are opening a hyperlink. You should click Yes. Or, if you see a dialogue that asks Select an app to open this ‘webcal’ link, choose Outlook.
7. Microsoft Office Outlook 2021, Outlook 2019, Outlook 2016, Outlook 2013 will start up
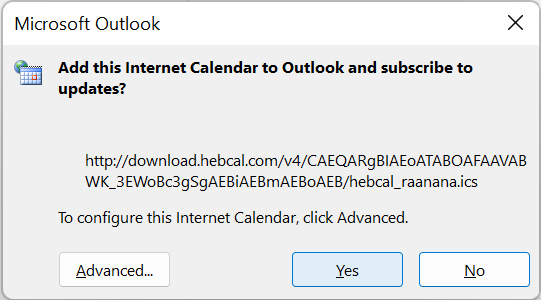
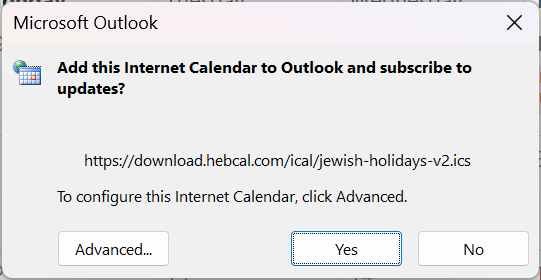
8. At the prompt, Add this Internet Calendar to Outlook and subscribe to updates, click Yes.
9. The Internet Calendar opens in side-by-side view in the Outlook Calendar and is added to the Navigation Pane in Calendar view under Other Calendars. The calendar will check periodically for any updates made by the calendar publisher.
If you need to remove Hebcal events from your Outlook calendar — for example, if you imported candle-lighting times with the wrong zip code — the steps depend on how you originally added the events.
Important: These instructions apply only if you manually imported Hebcal data into your primary Outlook calendar using a CSV or ICS file download. If you used Outlook’s Internet Calendar Subscription feature instead, you can simply unsubscribe from the calendar — no need to delete individual events.
Method 1: If you imported from an ICS file download
If you added events by clicking the “Download” button on the Hebcal website (the option that says “Use this download alternative if you prefer to manually import the calendar events into Outlook and merge with your own calendar”), the events were merged directly into your primary calendar from a .ics file. You can find and remove these events using search.
To delete holidays and other Jewish calendar events imported from ICS:
Open your Calendar and use the Search bar to search for hebcal. Most Hebcal events include a hebcal.com URL in the event description, so this search will find the majority of imported events.
Select the events you want to delete (use CTRL+click to select multiple events, or CTRL+A to select all search results).
Press DELETE to remove the selected events.
To delete candle-lighting and Havdalah times imported from ICS:
In the Calendar Search bar, search for the city name you selected when generating your calendar (for example, Boston).
Review the results to make sure you are only selecting Hebcal candle-lighting and Havdalah events (not other calendar events that mention your city).
Select the events you want to delete and press DELETE.
Method 2: If you imported from a CSV file
When Hebcal exports to CSV format, it puts the text “Jewish Holidays” in the Location field. This makes it easy to find and remove those entries in bulk.
Open your Calendar and on the View menu, point to Current View and click Events.
Click the Location column heading to sort the list by Location. You should see “Jewish Holidays” in the Location field for the holidays you imported.
Click to select the first holiday you want to delete.
Hold down SHIFT and click the last holiday you want to delete.
Press DELETE to remove all the selected holidays from your Calendar.
To delete candle-lighting and Havdalah times imported from CSV:
Open your Calendar and on the View menu, point to Current View and click Active Appointments.
Click the Location column heading to sort the list by Location. You should see the city name you selected when generating your calendar (for example, Boston) in the Location field for the candle lighting and other zmanim events you imported.
Follow steps 4–6 above.
Tip: If you’re setting up Hebcal again after deleting old events, consider using Outlook’s Internet Calendar Subscription feature instead of importing. Subscriptions keep Hebcal events on a separate calendar, so they won’t affect your free/busy status and can be removed all at once by unsubscribing.
Follow these instructions to add a Hebcal Jewish holiday calendar to older versions of Microsoft Outlook. This article applies to Outlook 97, 98, 2000, 2002, 2003 for Windows.
First, you’ll need to download an Outlook CSV (Comma-separated values) file from hebcal.com:
1. Open a web browser on your Microsoft Windows computer.
2. Fill out the form with your preferences and click the Create Calendar button
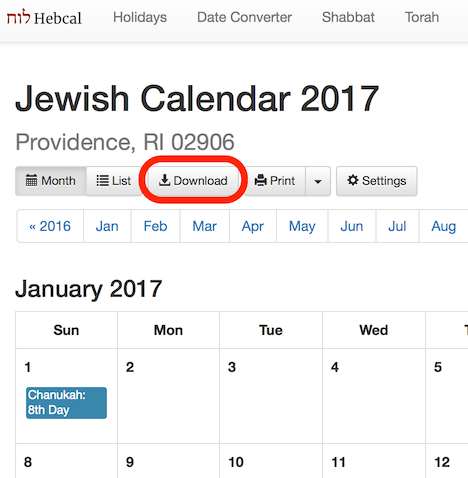
3. Click the Download… button
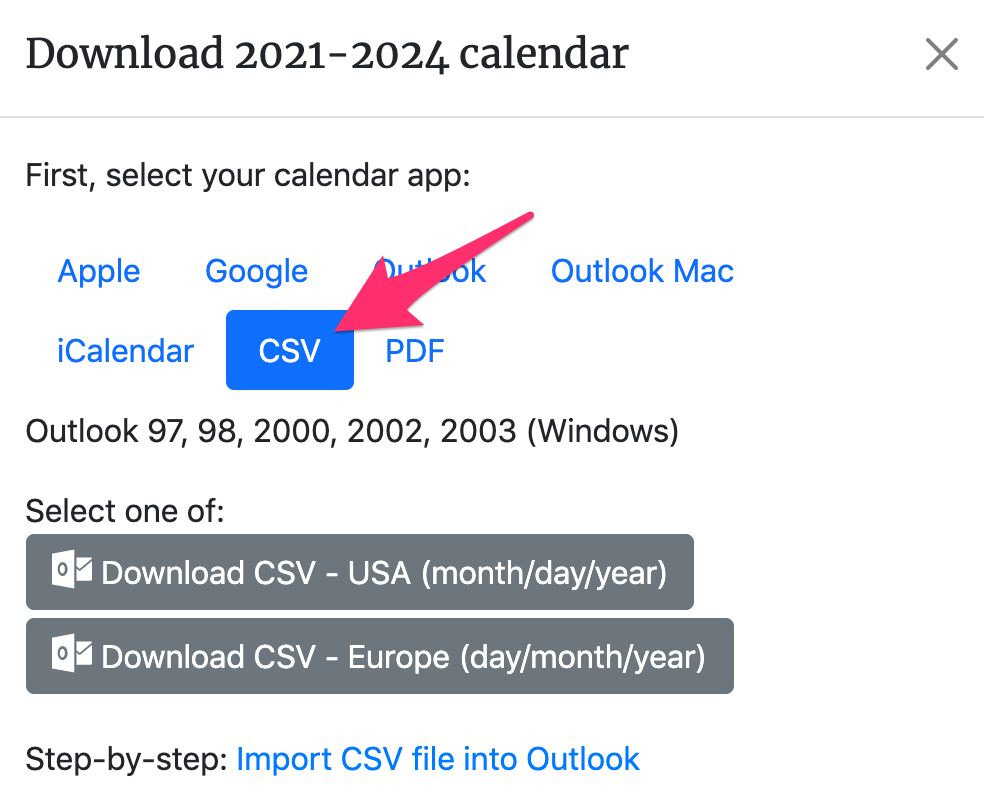
4. Select the CSV option from the Download dialog box
5. In the dialog box, select one of the two Download buttons – either Outlook CSV – USA date format (month/day/year) or Outlook CSV – European date format (day/month/year) (depending on whether you want USA or European date formats).
6. When prompted, specify a convenient name and location for the hebcal_DATE_LOCATION.csv file in the “Save As” dialogue box. We recommend saving the file on the Desktop
Select “Import from another program or file” and click Next
Select “Comma Separated Values (Windows)” and click Next
Find the hebcal_DATE_LOCATION.csv file you downloaded and select “Do not import duplicate items” and click Next
Select Calendar and click Next. This will import your chosen file
Included in the Hebcal Jewish holiday downloads are options to select major holidays (Rosh Hashana, Yom Kippur, Pesach, etc.), minor holidays (Purim, Chanukah, etc.), special Shabbatot, public fasts (Tish’a B’Av, etc.), Rosh Chodesh, and modern holidays (Yom HaAtzma’ut, etc.).
This page includes instructions on how to subscribe to a Hebcal Jewish holiday calendar 5-year feed in Microsoft Outlook for Mac 2011. This version of Outlook on macOS did not support iCalendar subscriptions and cloud sync, so it requires downloading a copy of events from Hebcal.com and manually managing them on your desktop.
Update: these are no longer the recommended instructions for modern versions of Microsoft Outlook on Mac. If you use Outlook 2016 for Mac or later, Microsoft now recommends that you sync your account to the Microsoft Cloud. “Available for Google accounts in Mail and Calendar, and Google, Yahoo, iCloud, and IMAP accounts in Outlook for Mac, this allows you to enjoy many of the best features of Mail and Calendar and Outlook for Mac.”
Fill out the form with your preferences and click the Create Calendar button
Click the Download… button
Select the Outlook Mac option from the Download dialog box
Click on the Jewish Calendar YYYY.ics download button
Next, find the downloaded .ics file (typically in your Downloads or Desktop folder). To get the Jewish holidays to show up with a color-coded category, be sure to drag and drop the .ics file you downloaded onto one of the category labels on the left pane as follows:
Screen shot of adding a hebcal.ics file to Outlook 2011 for macOS
If you simply drag the .ics file to Outlook 2011 icon in your dock or double-click on it, it will get categorized and color-coded as “No Category” which is probably not what you want.