
iPhone and iPad – remove Hebcal Jewish calendar (without iCloud)

To remove a Hebcal calendar from your iPhone or iPad that was subscribed directly from the iOS device, follow these steps:

  1. Go to the Settings app, then touch Mail, Contacts, Calendars.
  2. Tap Subscribed Calendars:
    hebcal-iphone-calendars-subscribed-2
  3. Tap the Hebcal calendar that you wish to remove from the list of subscribed calendars:
    hebcal-iphone-calendars-subscribed-3
  4. Scroll to the bottom of the page, and tap Delete Account
    hebcal-iphone-calendars-subscribed-4
  5. Tap Delete Account again to confirm.

See also: iCloud – remove Hebcal Jewish calendar

iCloud – remove Hebcal Jewish calendar

To remove an iCloud-managed Hebcal calendar from your iPhone or iPad, follow these three steps.

  1. Go to your Calendar app and tap Calendars at the bottom of the screen:hebcal-iphone-calendars-subscribed-0
  2. If you subscribed via iCloud, you will you see it in the iCloud section like this:
    hebcal-iphone-calendars-icloud-2
  3. Tap the circled small ⓘ info icon next to the Hebcal calendar name
  4. Scroll down and tap Delete Calendar
    hebcal-iphone-calendars-icloud-3
  5. Tap Delete Calendar again when prompted “Are you sure you want to delete this calendar? All events associated with the calendar will also be deleted.”

See also: iPhone and iPad – remove Hebcal Jewish calendar (without iCloud)

iPhone, iPad, iOS – remove Hebcal Jewish calendar

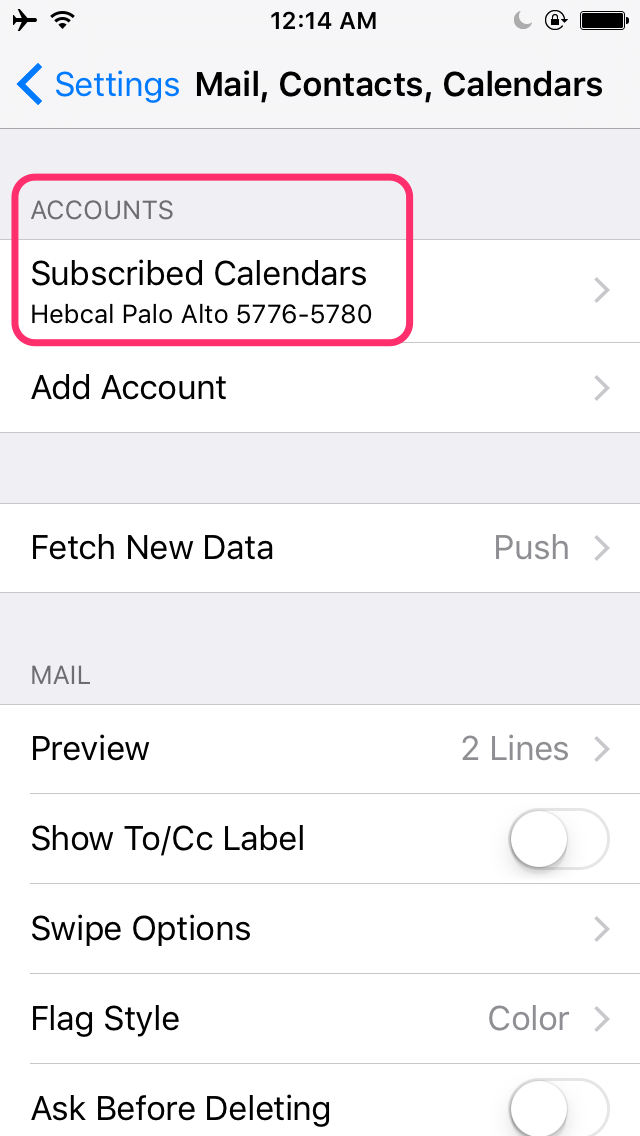
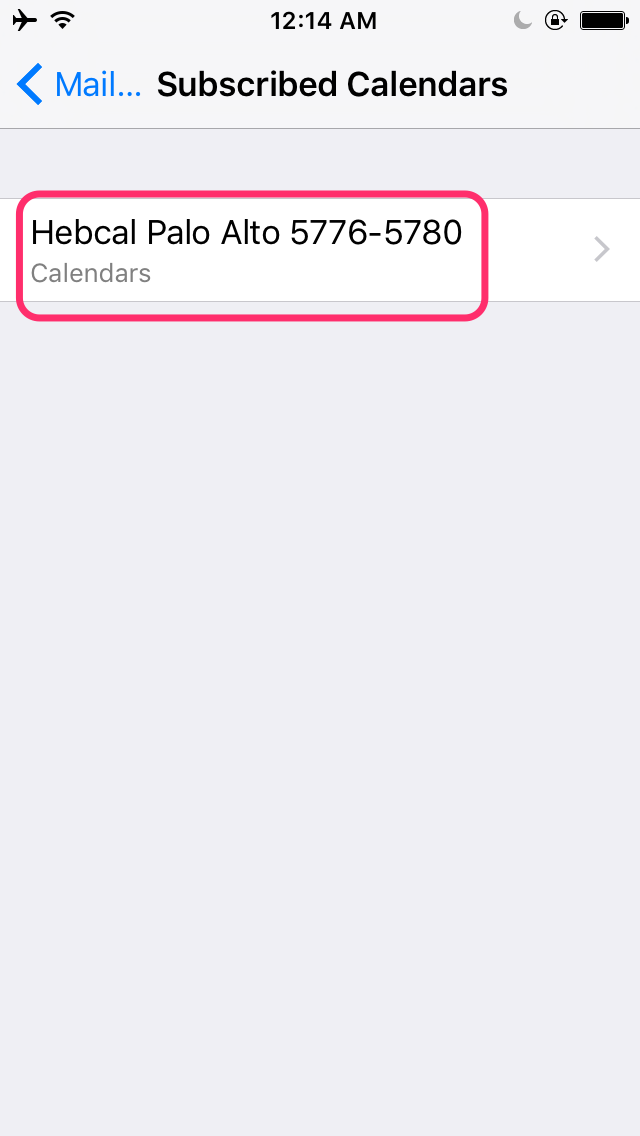
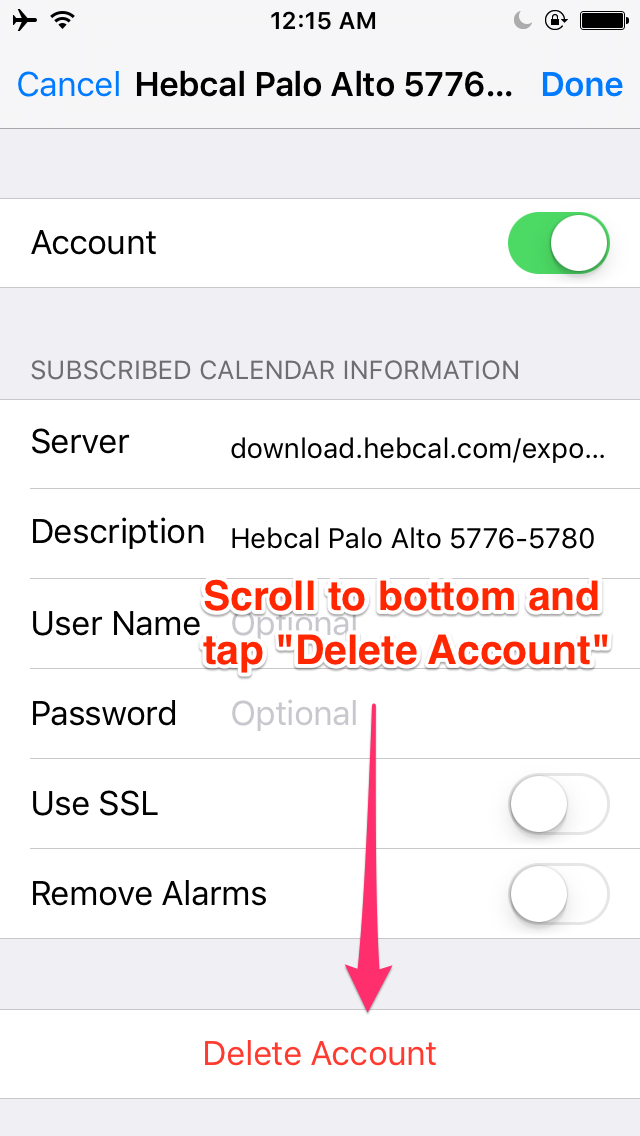
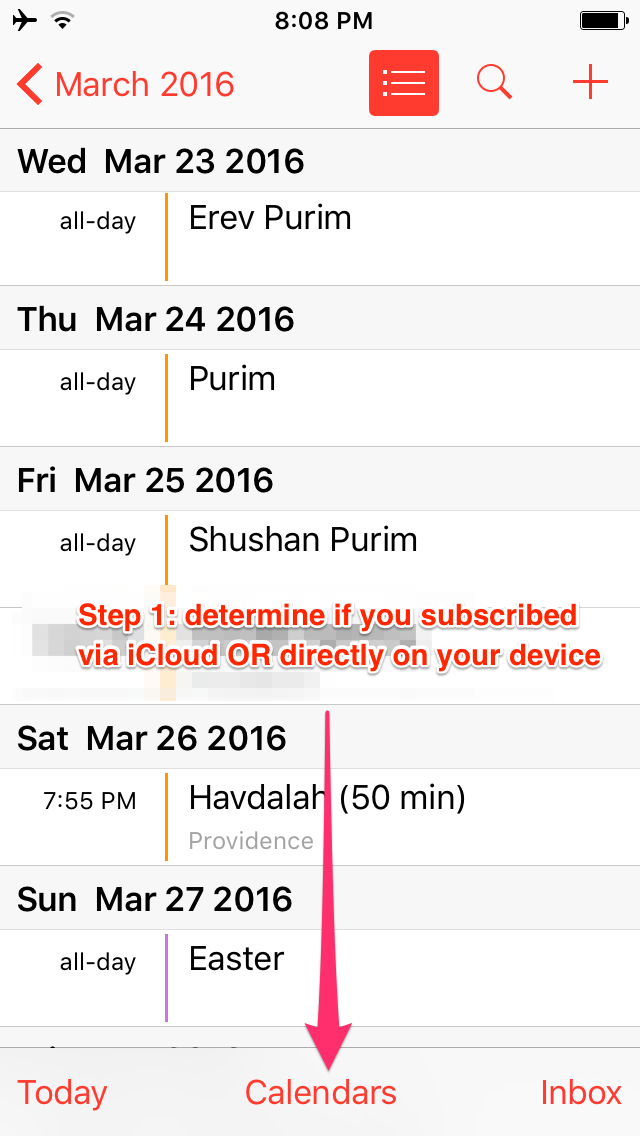
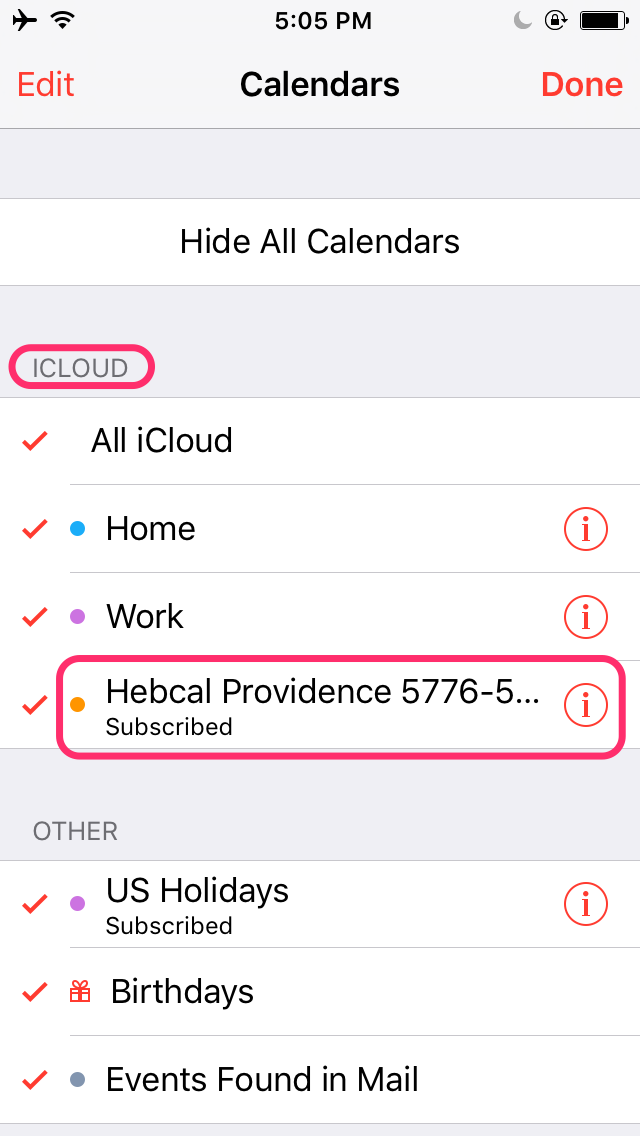
To remove a Hebcal calendar from your iPhone or iPad, you’ll need to first determine if you subscribed via iCloud or whether you subscribed directly from your iOS device.

Here are specific instructions for each option.

To determine which option applies to you, first go to your Calendar app and tap Calendars at the bottom of the screen:hebcal-iphone-calendars-subscribed-0

Subscribed via iCloud

If you subscribed via iCloud, you will you see it in the iCloud section like this:

hebcal-iphone-calendars-icloud-2

Read iCloud – remove Hebcal Jewish calendar for further instructions.

Subscribed directly on iPhone or iPad

If you subscribed directly on your iOS device, you will see Hebcal in the Subscribed section like this:
hebcal-iphone-calendars-subscribed-1

Read iPhone and iPad – remove Hebcal Jewish calendar (without iCloud) for further instructions.

Android calendar Jewish holidays download

We’re pleased to offer Jewish holiday downloads for many Android devices through a two step process that sends Hebcal data first to Google Calendar, and then to your Android phone or tablet.

Note that Hebcal is not an app for Android (in the Google Play sense of apps that you install). Rather, Hebcal is a website that allows you to download/export calendar data to the calendar application that comes natively with your device.

1. Follow our Google Calendar Jewish holidays download instructions.

2. Go back to your Android device and enable synchronization to Google Calendar. Follow Google’s Sync Calendar with a phone or tablet instructions.

Note that there appears to be a limitation in Android calendar where events more than one year in the future will NOT sync to your device. The events are visible on the Google Calendar on the Web but will not download to the device until the current date approaches more closely.

See these articles for more detail:

How do I sync Google Calendar events that occur more than one year in the future?

Android Bug #41281


Outlook Jewish holidays download for Windows PC

Follow these instructions to add a Hebcal Jewish holiday calendar 5-year feed to newer versions of Microsoft Outlook for Windows.

This technique uses Outlook’s “Internet Calendar Subscription” feature which keeps a separate calendar from your primary calendar. The calendar appears as an “overlay” and can be managed separately from your main calendar.

This method is preferred for modern versions of Outlook, e.g. Microsoft 365 / Office 365, Outlook 2021, Outlook 2019, Outlook 2016, Outlook 2013, etc. We still support the legacy CSV Jewish holiday download option used by Outlook 2007 and earlier versions.

1. Open a web browser on your Microsoft Windows computer.

2. Fill out the form with your preferences and click the Create Calendar button

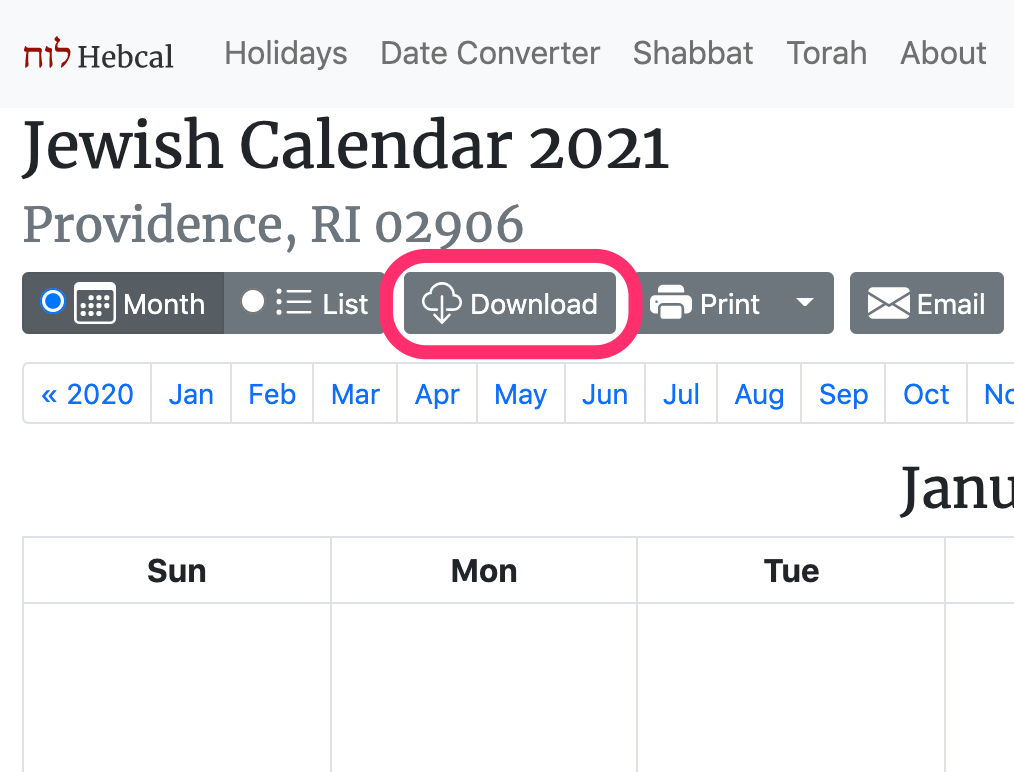
3. Click the Download… button

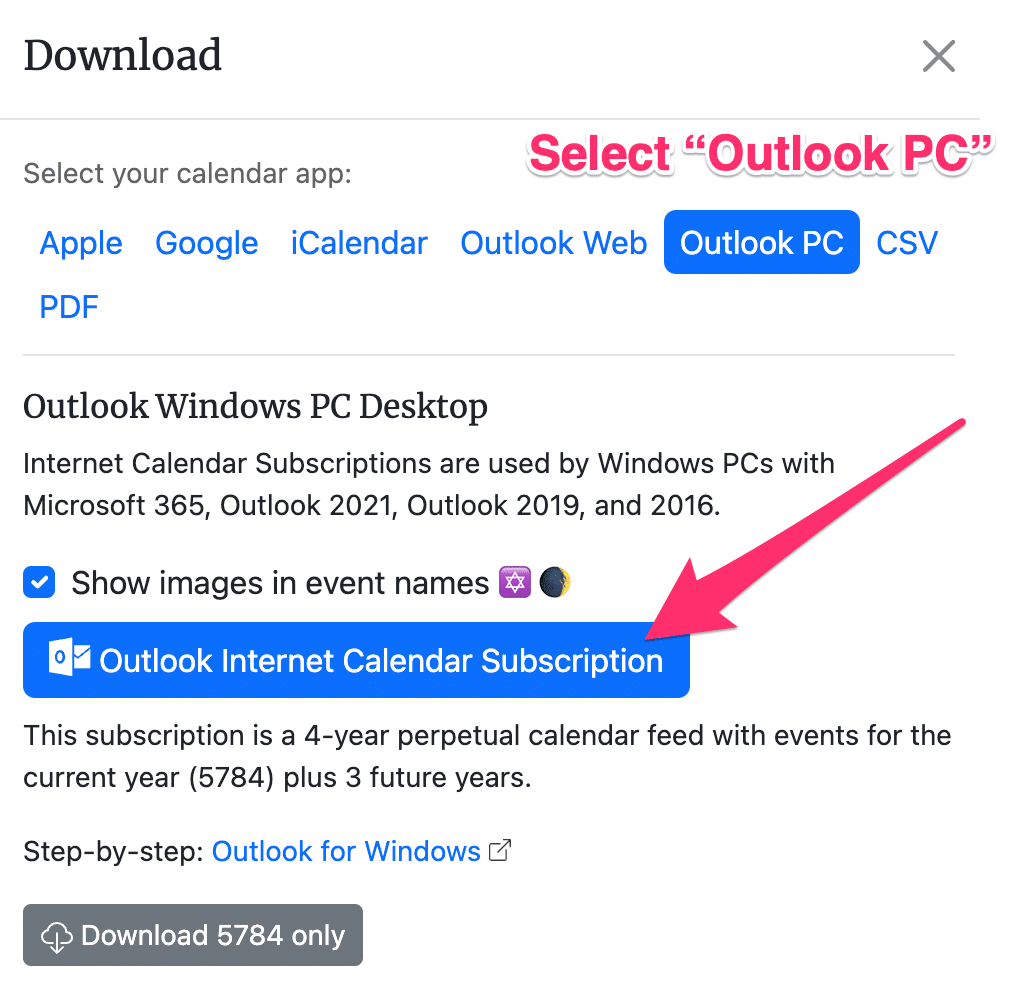
4. Select the Outlook option from the Download dialog box

5. Click on the Outlook Internet Calendar Subscription button

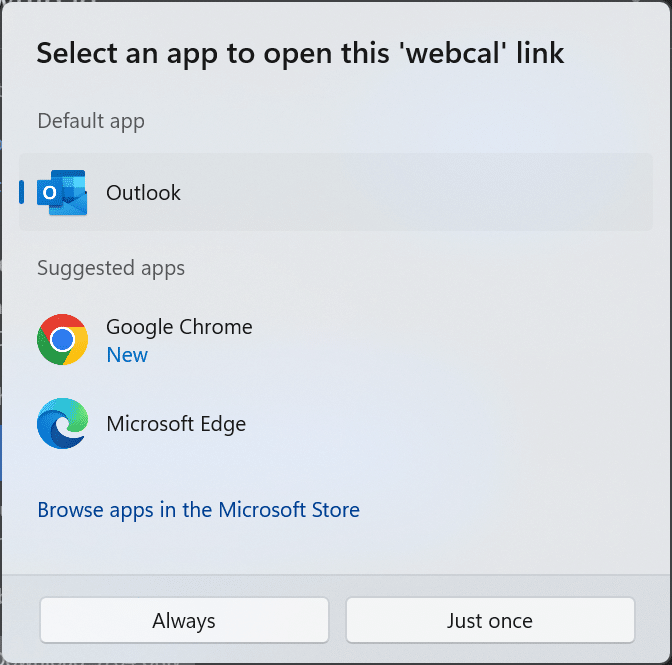
6. You might be prompted to acknowledge that you are opening a hyperlink. You should click Yes. Or, if you see a dialogue that asks Select an app to open this ‘webcal’ link, choose Outlook.

7. Microsoft Office Outlook 2021, Outlook 2019, Outlook 2016, Outlook 2013 will start up

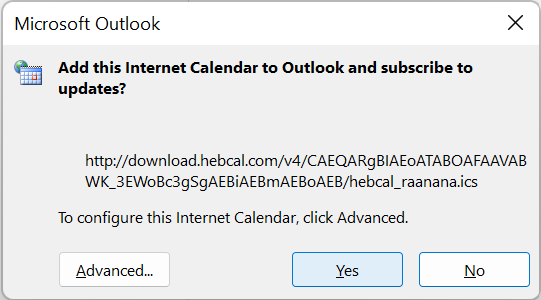
8. At the prompt, Add this Internet Calendar to Outlook and subscribe to updates, click Yes.

9. The Internet Calendar opens in side-by-side view in the Outlook Calendar and is added to the Navigation Pane in Calendar view under Other Calendars. The calendar will check periodically for any updates made by the calendar publisher.

10. For more details, see Microsoft Outlook – Add and import calendars from Microsoft’s support site.